
What is Stylchat?
The front end for your n8n automations — a chat window your visitors will actually use.
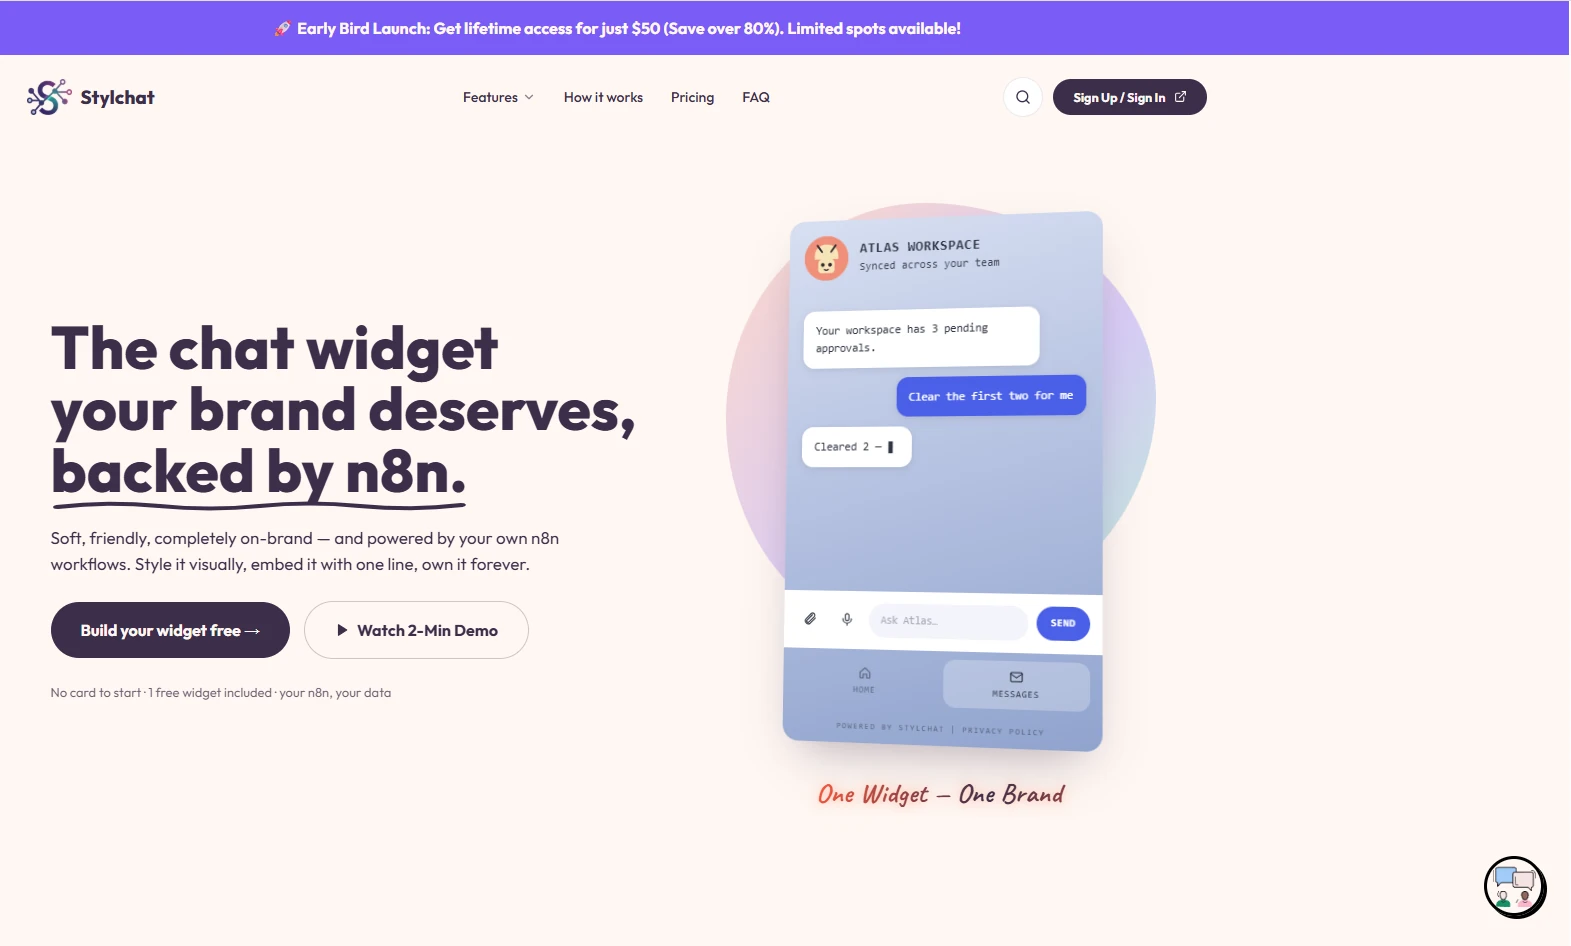
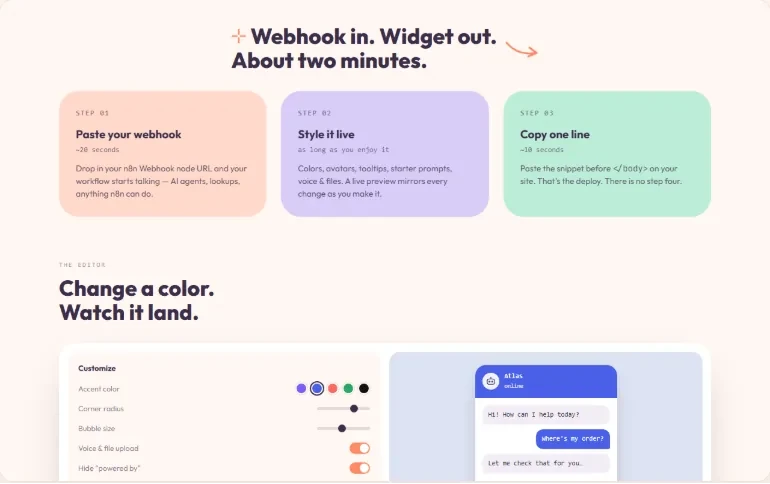
Stylchat is a visual builder for embeddable chat widgets. You design the widget in your browser, point it at an n8n Webhook node, and paste one script tag into your website. When a visitor sends a message, it goes straight from their browser to your n8n workflow — an AI agent, a database lookup, a third-party API, anything n8n can do — and the reply appears in the chat.
Use Stylchat when you want to:
- Keep control of your data. Connect the widget directly to your own n8n webhook so messages never pass through Stylchat's servers.
- Match your brand. Customize colors, avatars, fonts, themes, and white-label options so visitors only see your brand.
- Install quickly. Add one script tag before
</body>on any platform that accepts HTML.
Getting started
Create an account and sign in — no card required to start.
- Go to the Stylchat homepage and click Try it free (or Start building for free).
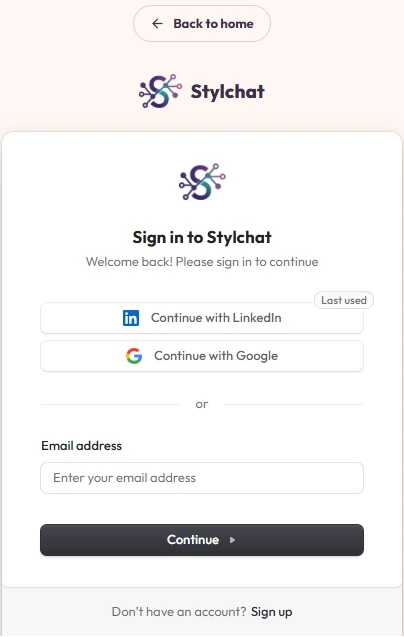
- Choose one of the available sign-up options: your email address, Google, or LinkedIn.
- Select the option that works best for you, then complete the sign-up process. If you signed up with email, you may be asked to confirm your address.
Your dashboard
Every widget you own, in one place.
After signing in you land on the dashboard. Each card is one widget, showing its name and the n8n webhook it's connected to (or "no webhook connected" if you haven't wired it up yet). Click any card to open it in the editor.
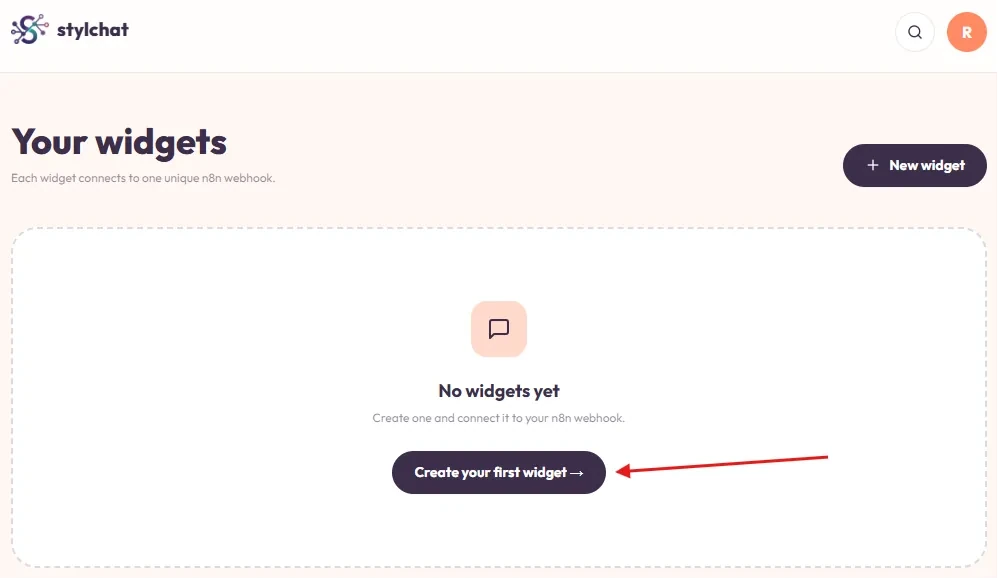
- New widget creates a fresh widget in one click. If you've used all your widget slots, the button changes: Pro plans show Buy another widget, free plans show Upgrade to Pro.
- The colored circle in the top-right corner is your account menu — open it to see your plan, manage billing, or sign out.
Customizing a widget
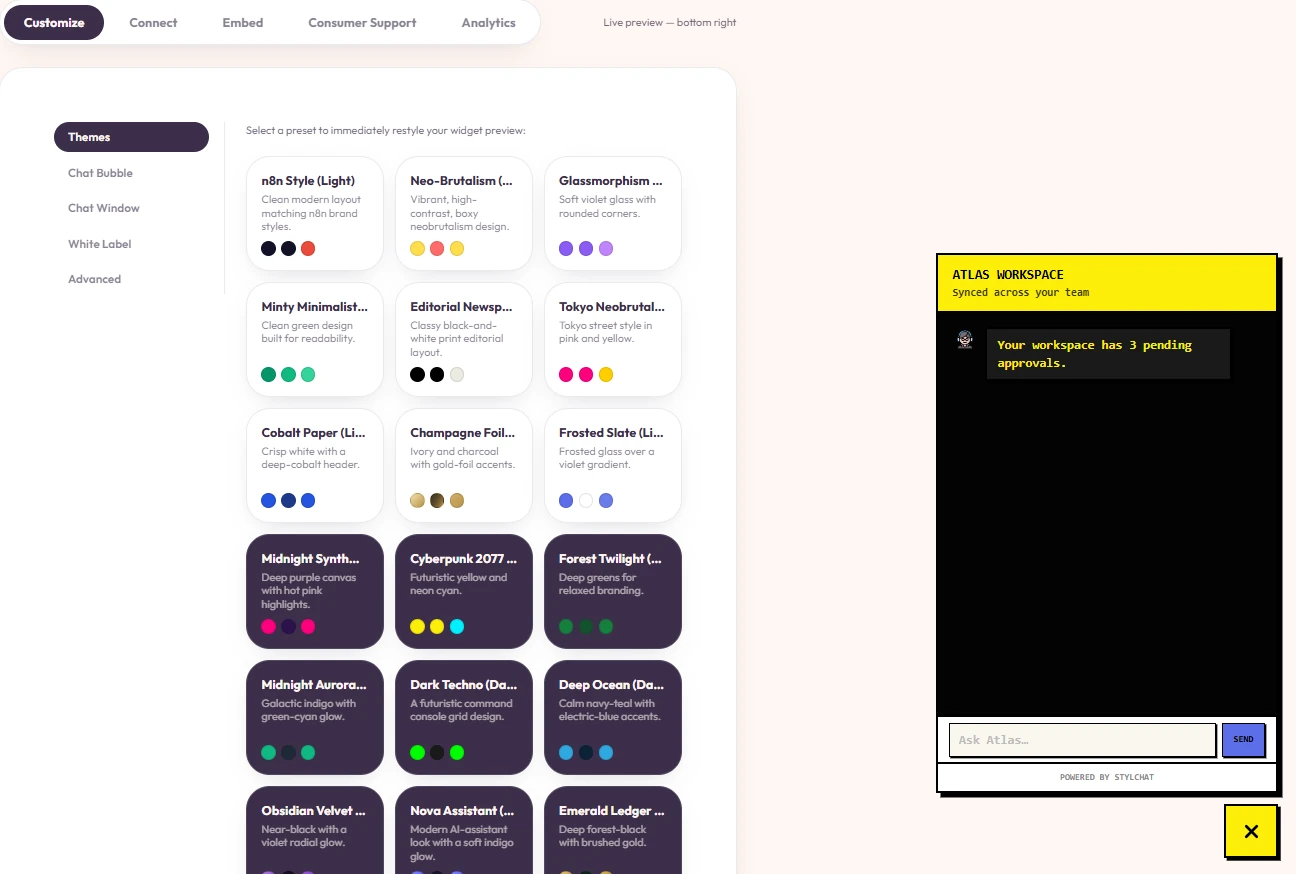
The Customize tab: style everything, watch it update live.
The editor has three tabs — Customize, Connect, and Embed — with a live preview of your widget floating on the right. Every change you make lands in the preview instantly, and your work saves automatically (watch the save indicator in the top bar). If you're on the free plan, start with the default theme and customize it to match your style — the customization panel is split into a few self-explanatory sections below.
| Panel | What you control |
|---|---|
| Themes | One-click presets — n8n Style, Neo-Brutalism, Minty Minimalist, Editorial Newsprint, Midnight Synthwave, Cyberpunk 2077 and more — that restyle the whole widget instantly. Pick one as a starting point, then fine-tune. |
| Chat Bubble | The floating launcher button: shape, colors, icon, and placement on the page. |
| Chat Window | The conversation itself: header title and subtitle, avatar, greeting message, starter prompts, colors, corner radius, fonts, light/dark, and right-to-left layout for Arabic, Hebrew, Farsi, and Urdu. |
| White Label | Remove the "powered by stylchat" footer, set your own brand name and link. (Pro) |
| Advanced | Custom CSS injection, consent screen, file upload, and voice input. (Pro) |
Themes
Themes are available in light and dark variants — pick whichever fits your brand. Browse the full set below and click any card to see it up close.
Chat Bubble
The Chat Bubble panel is divided into four sections:
- Bubble appearance
- Size & placement
- Behavior
- Tooltip and configuration
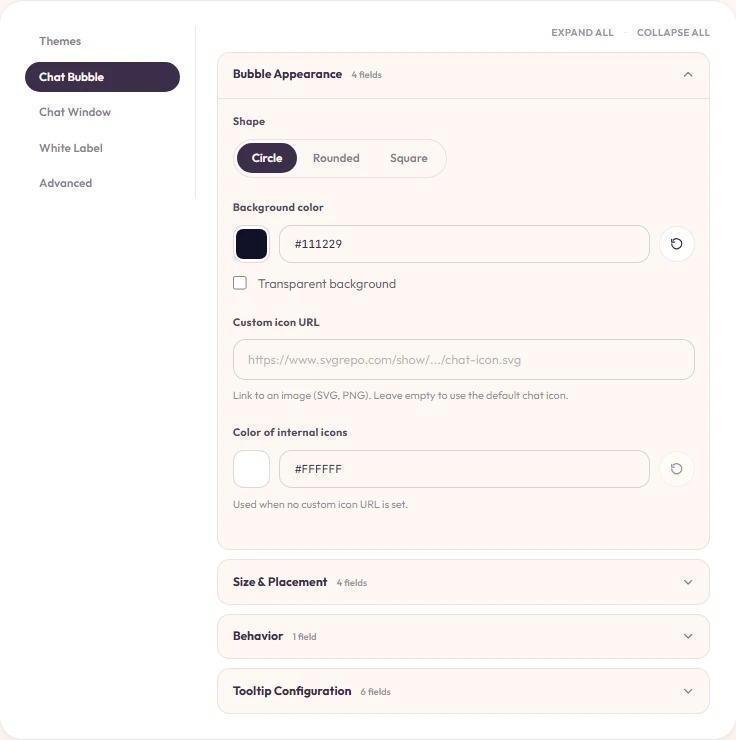
Bubble appearance
Controls the visual styling of the floating button before it is opened.
- Shape: Defines the button geometry (e.g., Circle, Rounded, Square).
- Background Color: Sets the primary fill color for the button.
- Custom Icon / Colors: Allows uploading a custom image/SVG or selecting the internal icon color.
- Transparency: Toggle to make the background fill transparent if needed.
Size & placement
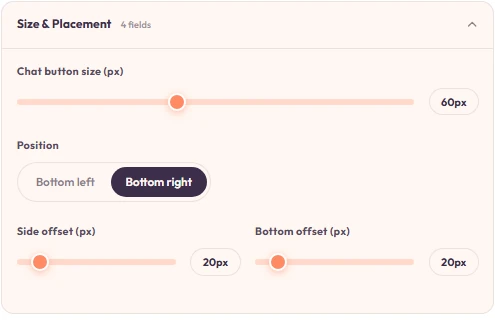
Determines where and how large the chat bubble renders on the screen.
- Chat Button Size: Sets the dimensions of the bubble in pixels (e.g., 60px).
- Position: Dictates which corner of the viewport the bubble anchors to (e.g., Bottom Right, Bottom Left).
- Side & Bottom Offsets: Fine-tunes spacing from the viewport edges in pixels.
Behavior
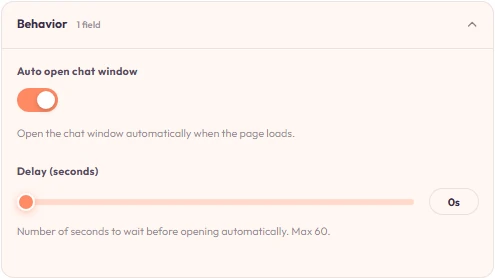
Manages the automated interaction rules when a user lands on the page.
- Auto Open Chat Window: Automatically expands the full chat window upon page load.
- Delay: Sets the specific wait time in seconds before the window automatically triggers.
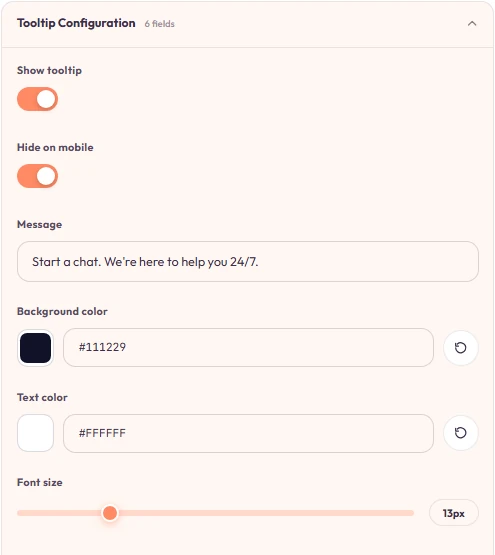
Tooltip and configuration
Configures the small teaser message box attached to the collapsed bubble.
- Visibility Toggles: Controls whether the tooltip is enabled or hidden on mobile devices.
- Message: The text prompt displayed to invite engagement (e.g., "Start a chat. We're here to help you 24/7.").
- Styling Options: Sets the background color, text color, and font size for the message card.
Chat Window
The Chat Window panel consists of the following sections:
- General Appearance
- Header Configuration
- Message Prompts
- Message Bubbles
- Input Area Settings
- Chat Behavior
- Widget Size Customization
- Home Tab Customization
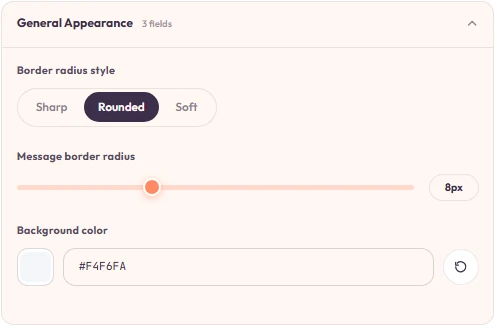
General Appearance
- Border radius style: Sets the corner shape for the overall chat container — Sharp (square corners), Rounded (standard soft corners), or Soft (fully rounded, pill-like corners).
- Message border radius: Controls the corner curvature specifically for individual message bubbles inside the chat window.
- Background color: Defines the background color for the main chat area behind the message bubbles.
Header Configuration
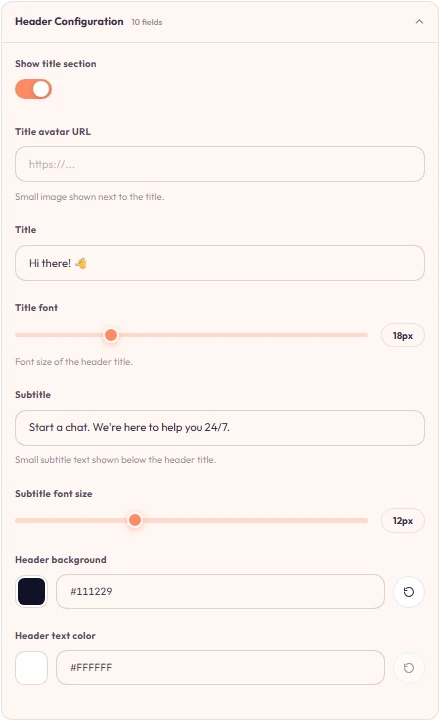
This section covers everything shown in the chat window's top header bar.
- Show title section: Toggle switch to display or hide the entire top header bar.
- Title avatar URL: Image URL for the small icon or logo displayed in the header next to the title.
- Title: The main heading text at the top of the chat (e.g., "Hi there! 👋").
- Title font: Font size of the main header title text.
- Subtitle: Supporting description or status text below the title (e.g., "Start a chat. We're here to help you 24/7.").
- Subtitle font size: Font size for the subtitle text.
- Header background: Background color of the top header section.
- Header text color: Color of the title and subtitle text in the header.
Message Prompts
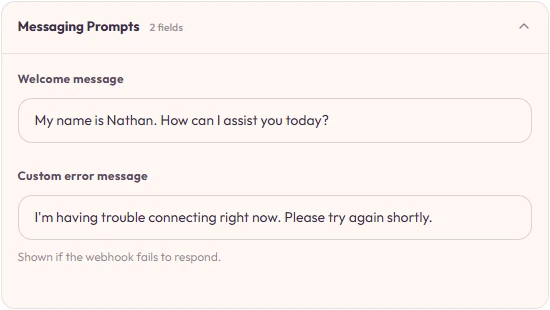
This section configures automated system messages that guide users during key moments in the conversation.
- Welcome message: The greeting sent automatically by the bot as soon as a visitor opens the chat window.
- Custom error message: The fallback message displayed when the backend system or workflow fails to process a request.
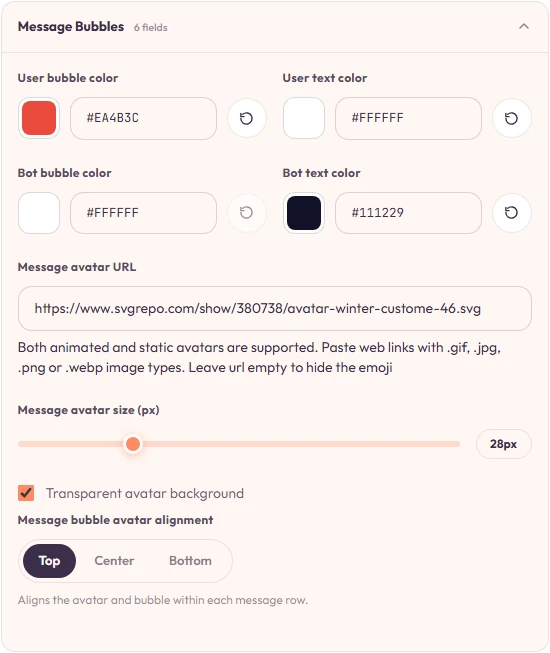
Message Bubbles
This section details how sent and received messages appear, including colors, avatars, and alignment.
- User bubble color: Sets the background shade for messages sent by the visitor.
- User text color: Sets the font color for the visitor's message text.
- Bot bubble color: Sets the background shade for responses generated by the bot.
- Bot text color: Sets the font color for the bot's response text.
- Message avatar URL: An image link for the icon displayed beside bot responses.
- Message avatar size: Controls the display dimensions of the message avatar icon.
- Transparent avatar background: Removes any background color fill behind the avatar image.
- Message bubble avatar alignment: Vertically aligns the avatar icon alongside the message bubble (Top, Center, or Bottom).
Input Area Settings
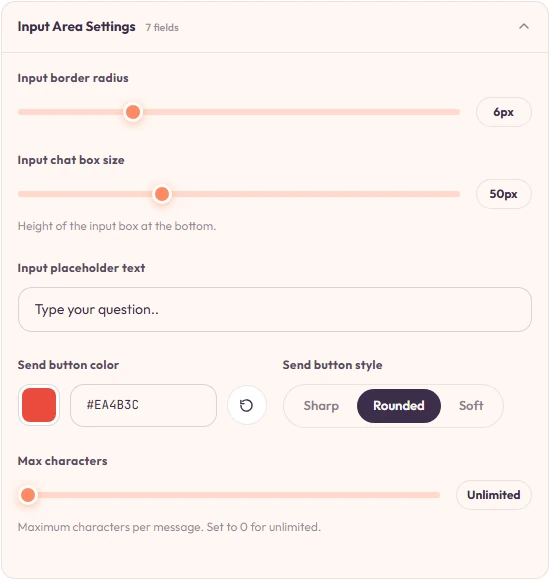
This section governs the visual layout and text entry rules for the chat input field at the bottom of the widget.
- Input border radius: Controls the corner roundness of the text entry field.
- Input chat box size: Defines the height of the bottom input area.
- Input placeholder text: Placeholder prompt text visible inside an empty input box.
- Send button color: Defines the shade of the submit button.
- Send button style: Sets the corner shape for the send button (Sharp, Rounded, or Soft).
- Max characters: Sets a limit on how many characters a user can type in a single message.
Chat Behavior
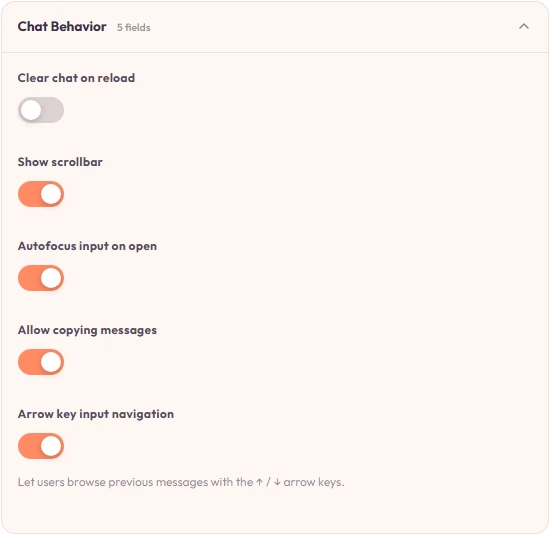
This section defines interactive features, control preferences, and how the widget responds to user actions.
- Clear chat on reload: Resets and wipes the current conversation history whenever the browser page is refreshed.
- Show scrollbar: Forces the chat window scrollbar to remain visible when content extends beyond the view.
- Autofocus input on open: Automatically places the typing cursor in the chat field when the widget opens.
- Allow copying messages: Enables visitors to select and copy text directly out of chat bubbles.
- Arrow key input navigation: Lets users press the up and down arrow keys to navigate through their previously sent messages.
Widget Size Customization
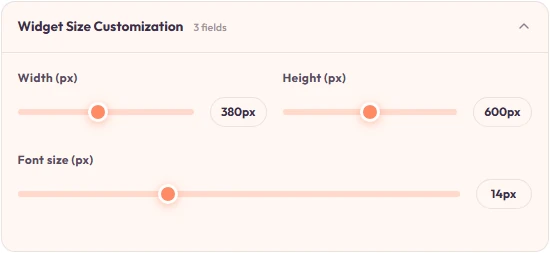
Set the widget's overall width, height, and base font size in pixels.
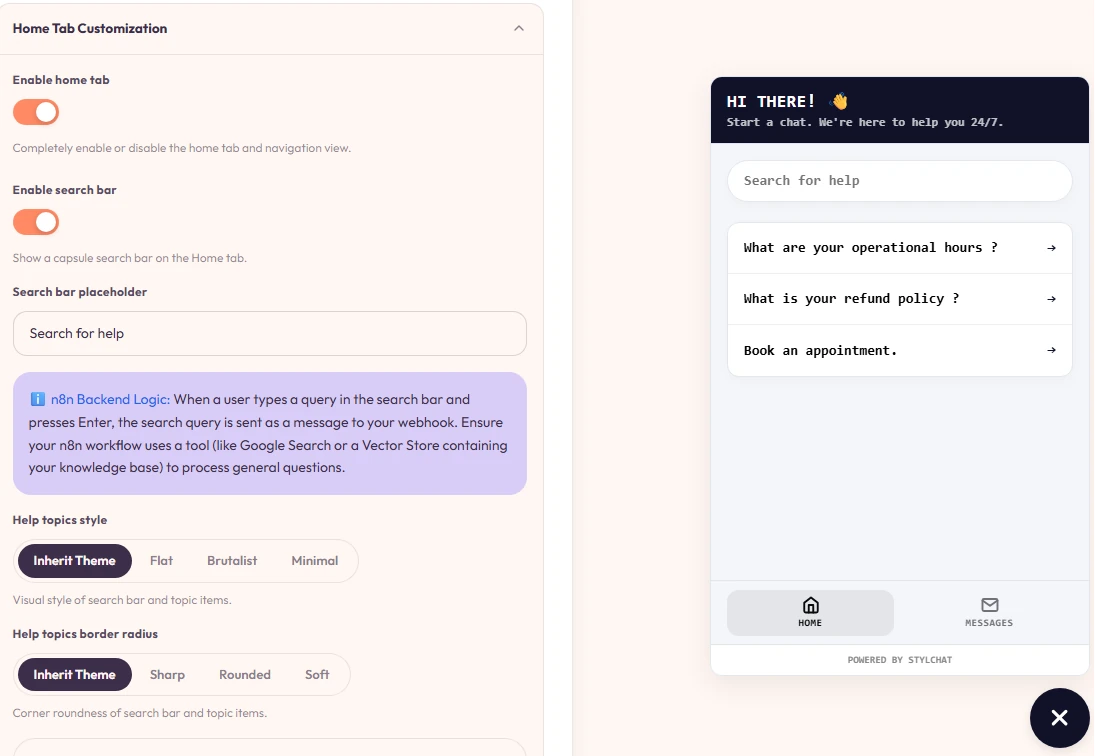
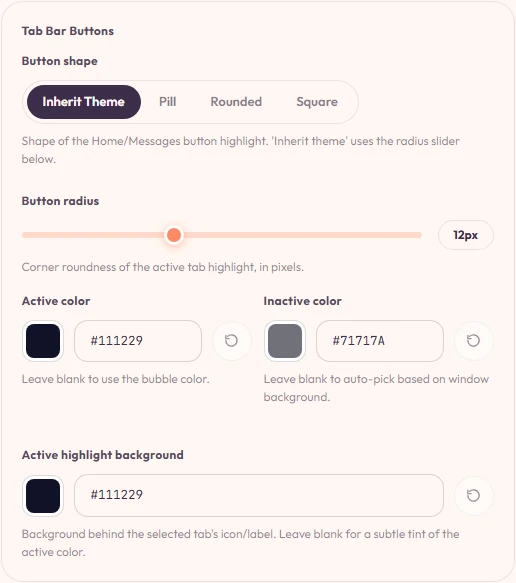
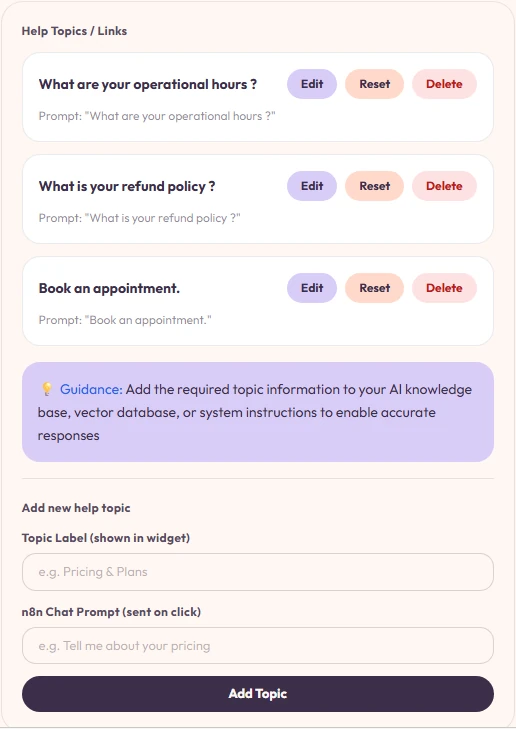
Home Tab Customization
This section controls the optional landing view inside the widget, allowing visitors to search help items or select quick actions before chatting.
- Enable home tab: Toggles the multi-tab layout on or off to provide a home view before starting a chat.
- Enable search bar: Places a functional search bar on the home screen to query knowledge base content.
- Search bar placeholder: Placeholder text shown inside the home tab search field.
- Help topics style: Sets the visual design style for search elements and topic cards (Inherit Theme, Flat, Brutalist, or Minimal).
- Help topics border radius: Sets the corner shape for search items and topic cards.
Pro features
| Feature | What you can set |
|---|---|
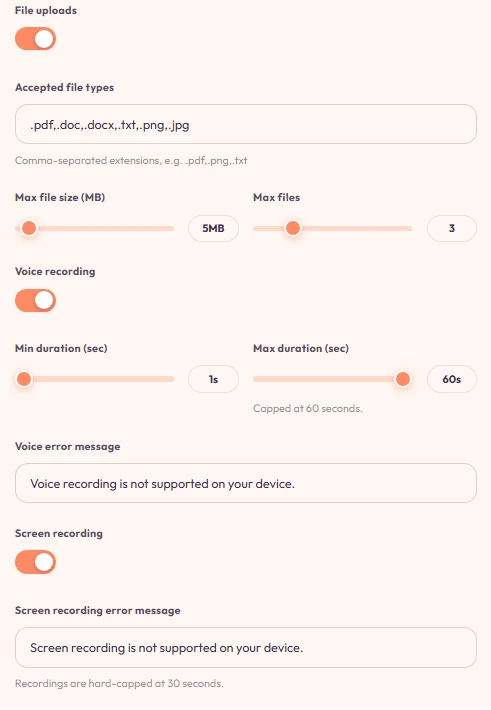
| File uploads | Let visitors attach files to their messages. Configure accepted file types (comma-separated extensions, e.g. .pdf,.png,.txt), max file size (default 5MB), and max number of files (default 3). |
| Voice recording | Let visitors send voice messages. Set the minimum and maximum recording duration, capped at 60 seconds, plus a custom error message for devices that don't support it. |
White Label
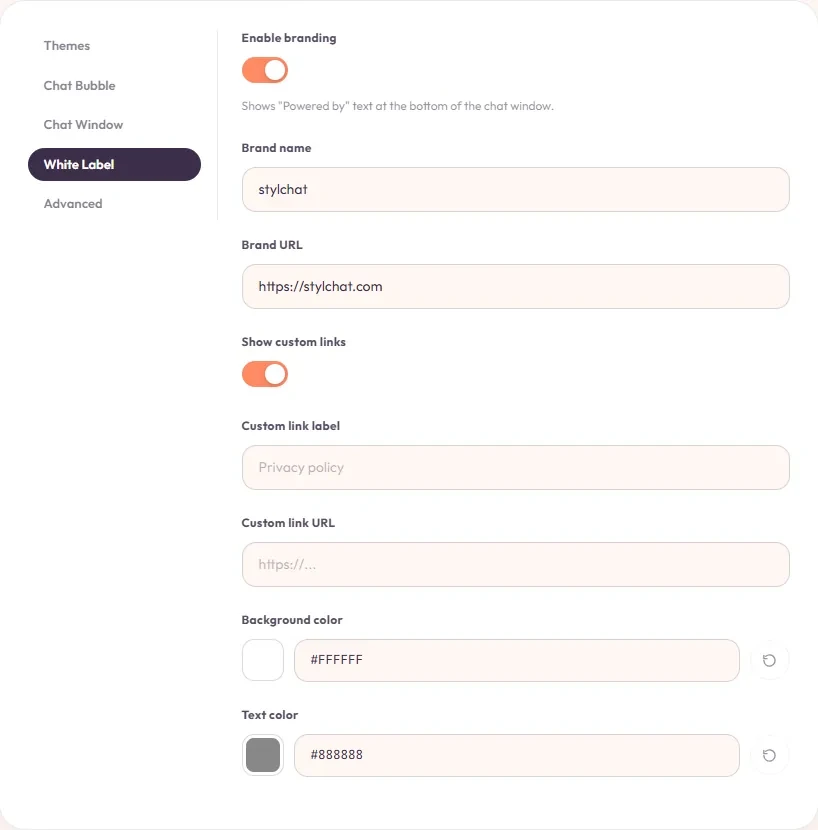
Toggle whether "Powered by stylchat" text shows at the bottom of the chat window, set your own brand name and brand URL, optionally show a custom link (for example a Privacy Policy link with your own label and URL), and pick background and text colors for the footer bar.
Advanced
Consent screen
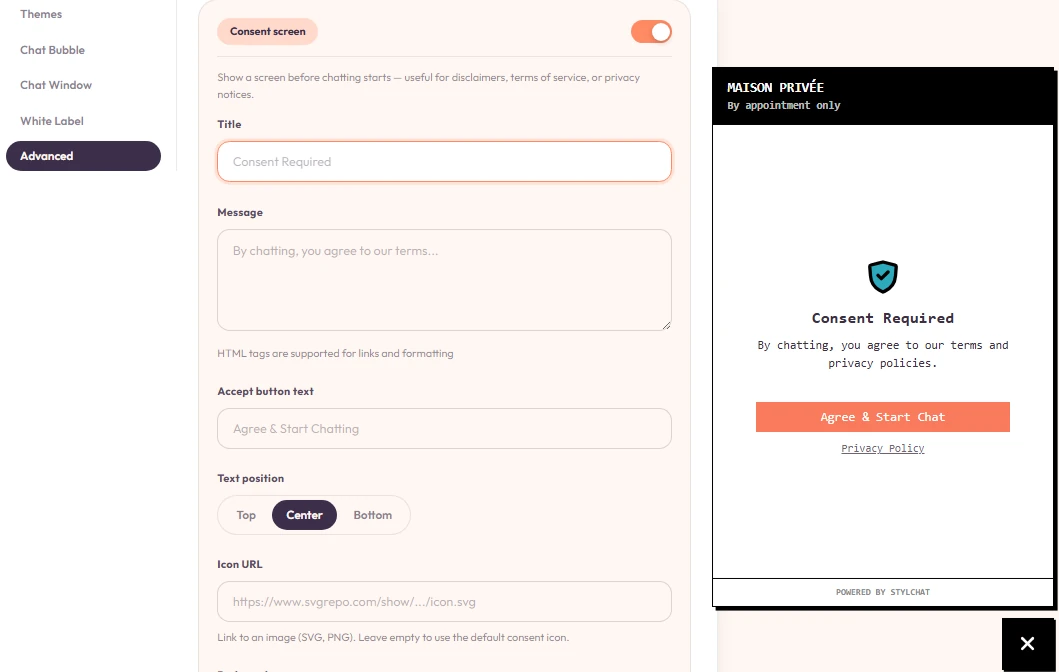
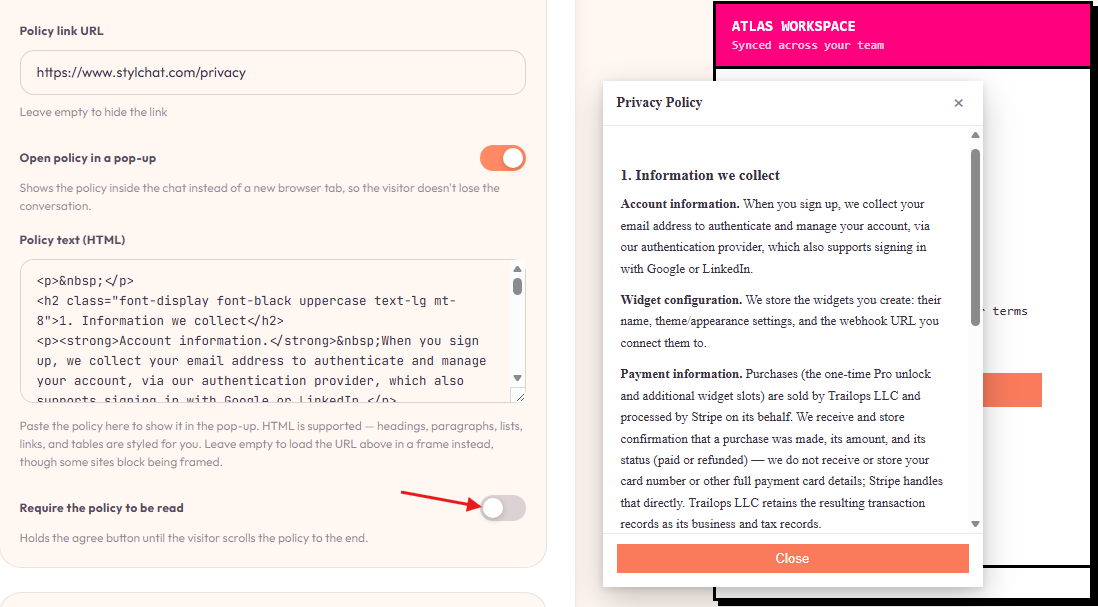
Toggle a message that appears before a chat begins — useful for privacy notices or terms of service — with a custom "Agree & start chat" button.
RTL / LTR
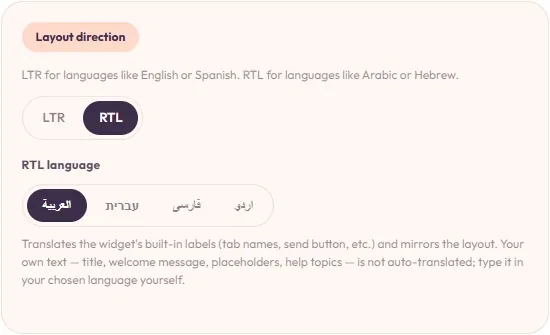
Switch between Left-to-Right (for languages like English or Spanish) and Right-to-Left, with a language picker for Arabic, Hebrew, Farsi, and Urdu. This translates the widget's built-in labels (tab names, send button, etc.) and mirrors the layout. Your own text — title, welcome message, placeholders, help topics — is not auto-translated, so type it in your chosen language yourself.
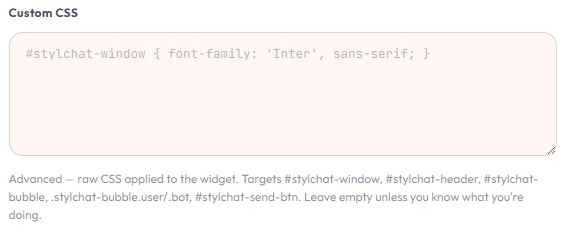
Custom CSS
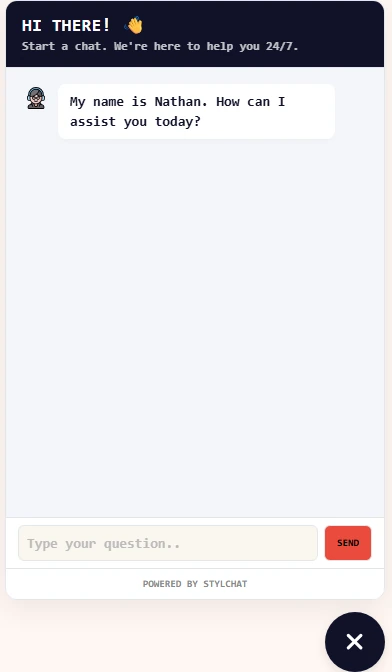
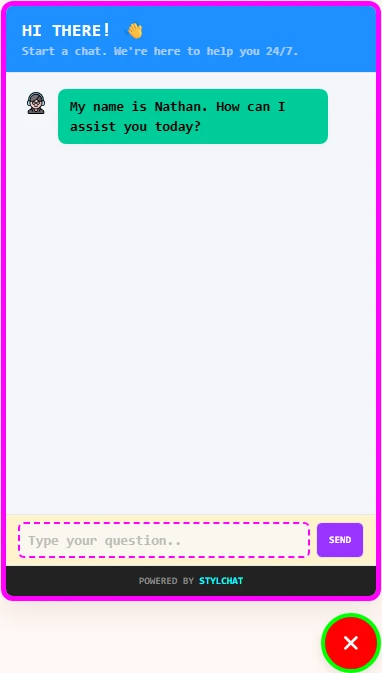
Raw CSS applied to the widget. Leave empty unless you know what you're doing. Here's a small test stylesheet you can paste into the CSS box to try it out — it overrides the bubble, window frame, header, message bubbles, input area, footer, and tab bar with deliberately loud colors, so you can see exactly which part of the widget each selector controls.
Sample CSS — simply paste it into the CSS box to test it:
/* Launcher bubble */
#stylchat-bubble {
  background: #ff0000 !important;
  border: 4px solid #00ff00 !important;
}

/* Chat window frame */
#stylchat-window {
  border: 5px solid magenta !important;
}

/* Header */
#stylchat-header {
  background: #1e90ff !important;
}
.stylchat-header-title {
  color: #ffffff !important;
}
.stylchat-header-subtitle {
  color: #e0e0ff !important;
}

/* Message bubbles */
.stylchat-bubble.user {
  background: #ffcc00 !important;
  color: #000000 !important;
}
.stylchat-bubble.bot {
  background: #00cc99 !important;
  color: #000000 !important;
}

/* Input area */
#stylchat-input-area {
  background: #fff3cd !important;
}
#stylchat-text-input {
  border: 2px dashed #ff00ff !important;
}
#stylchat-send-btn {
  background: #9933ff !important;
  color: #ffffff !important;
}

/* Footer */
#stylchat-footer {
  background: #222222 !important;
}
#stylchat-footer a {
  color: #00ffff !important;
}

/* Tab bar */
#stylchat-tab-bar {
  background: #333333 !important;
}
CSS output on default theme:
Connect Tab
Paste your webhook URL, then test a real conversation.
- In n8n, create a workflow that starts with a Webhook node (method: POST) and ends by responding with the reply text. Activate the workflow and copy the production webhook URL.
- In the Connect tab, paste that URL into the n8n webhook URL field. It's stored with your widget and never shared with anyone else.
- Use the Test it panel to send a real message. It POSTs to your webhook exactly like the live widget will, and shows the reply — so you know everything works before you embed.
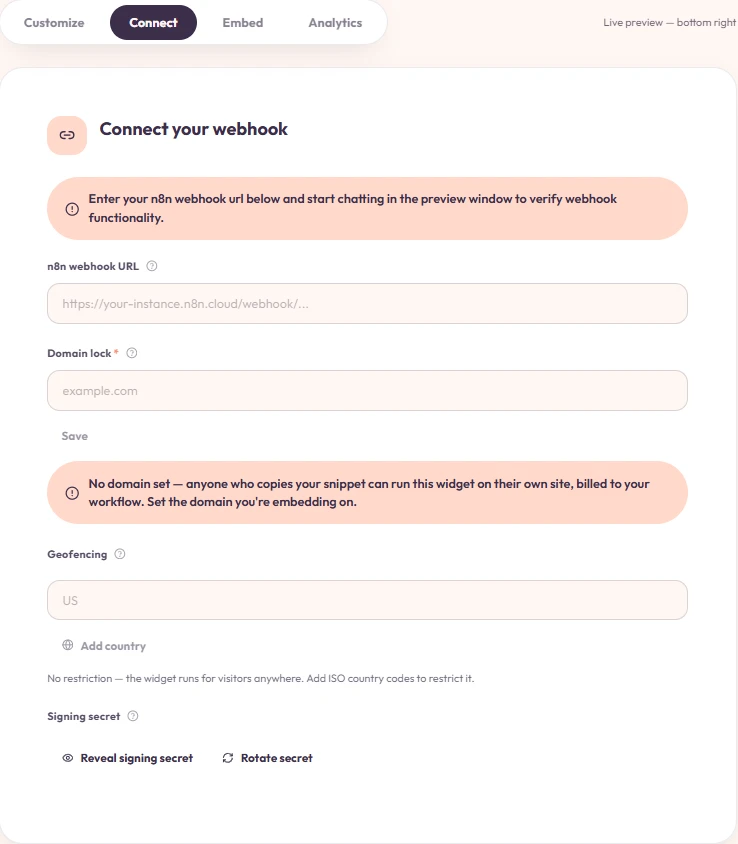
Below the webhook URL, the Connect tab also has Domain lock, Geofencing, and Signing secret — see Security considerations for how each one works.
Each message arrives at your webhook as JSON with a chatInput field containing the visitor's text (or as a multipart request when files are attached). Whatever text your workflow returns is rendered as the assistant's reply.
Use the test window to check responses live. This standalone feature helps verify connectivity and run pre-production tests before you go online.
If something goes wrong
While your workflow is thinking, visitors see a typing indicator. If the request fails — your n8n is down, or the workflow errors — the widget shows a clear error message instead of leaving them staring at nothing. Since Stylchat is not in the request path, your widget's uptime is exactly your n8n's uptime.
Embed Tab
One snippet, any website.
The Embed tab generates a ready-to-paste snippet containing your widget's full design and webhook connection. Choose one of the two deployment methods below and paste it just before the closing </body> tag of your site. The widget mounts itself — no plugin, no build step.
- Standard Script (ES Module). A copy-pasteable
<script type="module">snippet. It loads the widget loader dynamically and initializes it using an inlineChatWidget.init()configuration object. Use this first — it works in most cases. - CSP-Compliant Script (No-Module). An alternative
<script>block for websites with strict Content Security Policy rules that block inline scripts or ES module imports. It loads an externalembed.nomodule.jsfile and passes your entire configuration safely through a URL-encodeddata-stylchat-configattribute. Use this only if the standard script is blocked.
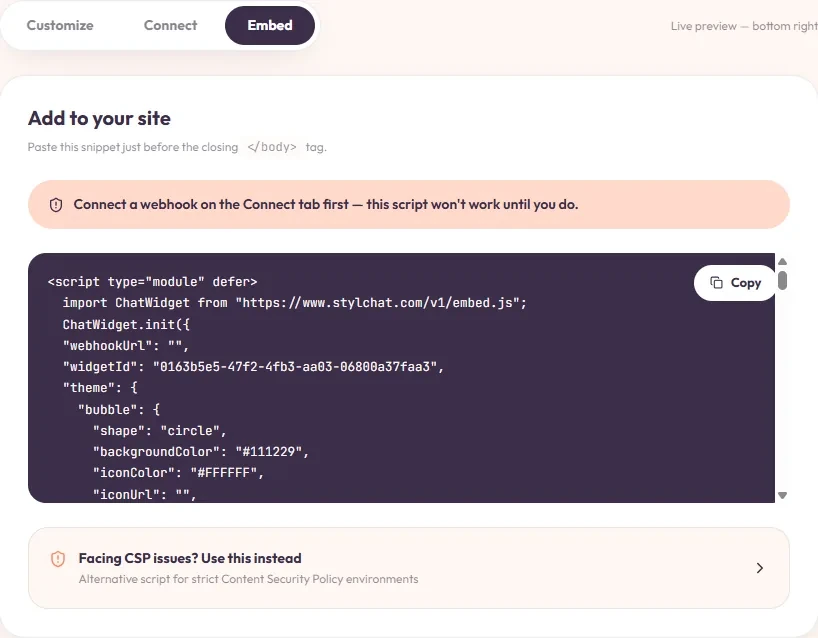
</body>.- Works everywhere: WordPress, Shopify, Webflow, Squarespace, React/Next.js apps, or a plain HTML file.
- Connect first: if you haven't connected a webhook yet, the tab reminds you — the script won't have anywhere to send messages until you do.
Customer support
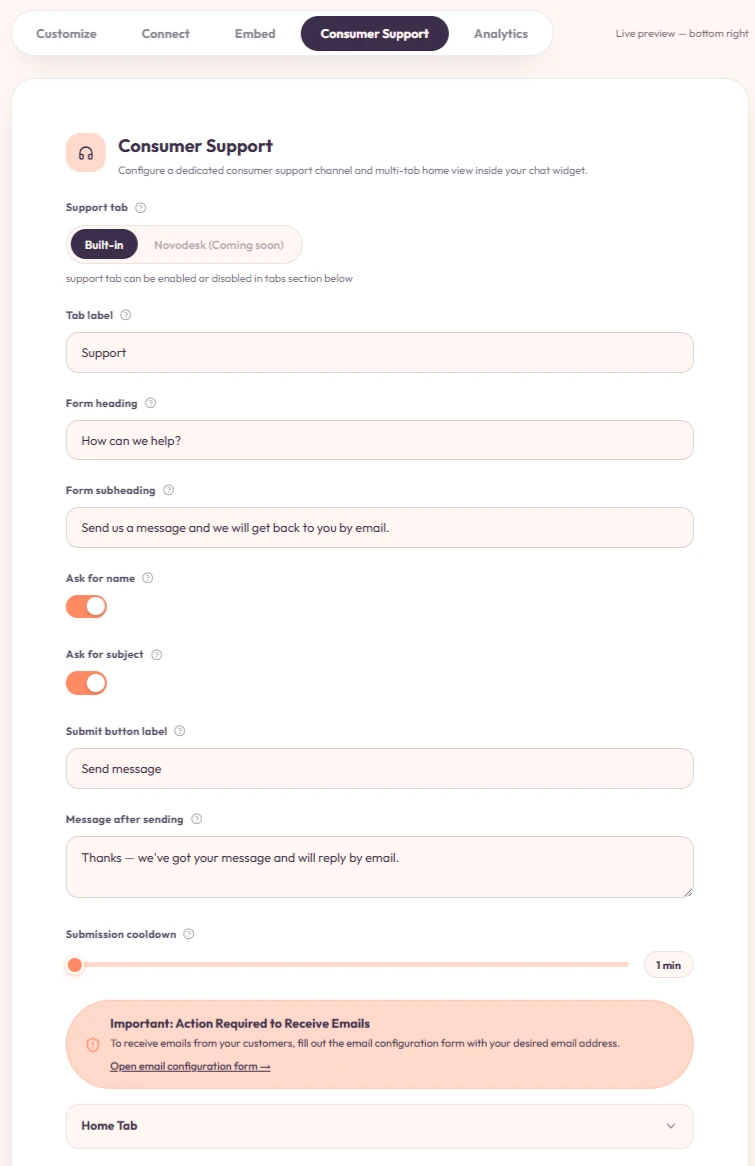
Set up and customize a built-in contact form within your chat widget.
This tab allows you to set up and customize a built-in contact form within your chat widget. It controls how customers reach out to you and what information they see during the process.
- System Selection: Choose between the default built-in support system or upcoming integrations like Novodesk.
- Text Customization: Edit the visible text on the widget, including the tab label, form heading, subheading, and the submit button label.
- Confirmation Message: Customize the automated response users see immediately after they send a message.
- Form Fields: Use toggles to decide whether to ask customers for their name and a subject line before they can submit a request.
- Submission Cooldown: Set a time limit between messages to manage the volume of incoming requests.
- Email Forwarding Setup: Access the critical email configuration form. You must fill this out with a destination email address to ensure you actually receive the messages your customers submit.
- Home Tab View: Enable or disable a multi-tab home layout inside the chat interface.
Analytics Tab
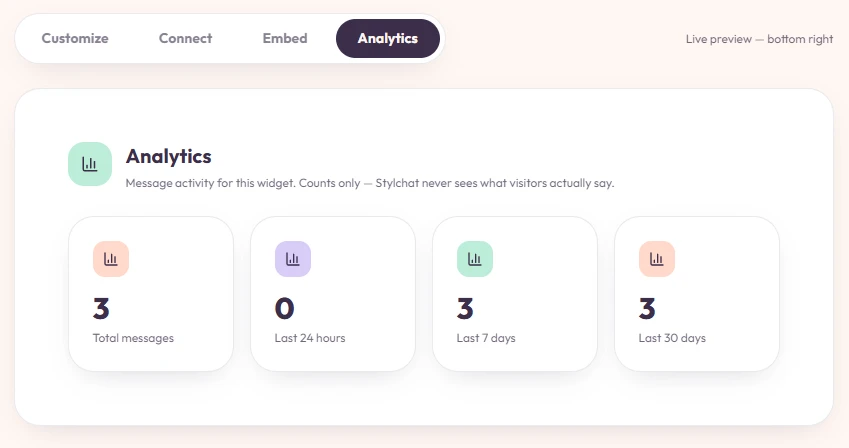
Message activity for this widget — counts only.
The Analytics tab covers how to monitor user interaction and track engagement metrics for your Stylchat chat widget.
Understanding your metrics
- Total Messages. The cumulative count of all interactions processed by the widget since deployment.
- Last 24 Hours. Recent activity volume measured over the past full day.
- Last 7 Days. Weekly engagement trends to evaluate ongoing user adoption.
- Last 30 Days. Monthly overview used to measure sustained growth and usage patterns.
Security considerations
Your webhook URL is public once embedded — here's how to protect the workflow behind it.
Messages travel straight from your visitor's browser to your n8n workflow, which is what keeps your data out of Stylchat's hands. The trade-off is that the embed snippet contains your webhook URL in plain text, and anyone who views your page source can read it. That's true of any widget that calls your workflow directly, and it can't be hidden — a URL the browser has to call is a URL the visitor can see.
In practice this means someone could send requests to your workflow without going through your widget. Whether that matters depends entirely on what your workflow does: a workflow that answers questions from a public FAQ has little to lose, while one that calls a paid AI model or writes to your database has real exposure. Treat your webhook URL as public information and put protection in the workflow itself.
Start with these
Worth doing for every workflow, regardless of what it does:
- Rate limit in front of n8n. Put a proxy such as Cloudflare in front of your n8n instance and set a per-IP rate limit on the webhook path. This is usually the single highest-value change you can make — it caps how much damage an automated script can do in an hour, and it takes an afternoon to set up on a free plan.
- Validate the message before doing any real work. Add an IF node right after your Webhook node that rejects anything malformed — an empty or missing
chatInput, or a message longer than you'd ever expect (say 2,000 characters). Put this before any node that costs money, so junk requests are discarded cheaply. - Watch your invocation volume. Abuse of a public URL gets caught by noticing it, not by preventing it. A scheduled n8n workflow or your proxy's analytics can alert you when hourly requests jump well above your normal traffic.
If your workflow costs money to run
Any workflow that calls a paid AI model or metered API needs a spending floor beneath it:
- Set a hard budget cap with your AI provider. OpenAI, Anthropic, and most metered APIs let you set a monthly limit. This doesn't stop abuse — it stops abuse from turning into an unexpected invoice, which is usually the real concern.
- Use a dedicated API key for this workflow. If the key is shared with your other systems, a runaway loop here takes those down with it. A separate key contains the problem to one workflow.
Domain lock
On the Connect tab, right under your webhook URL, there's a Domain lock field. Set it to the domain you're embedding on and Stylchat refuses to start the widget on any other site, so a copied snippet stops working.
A widget locks to one domain. Type over it and press Save to move the lock; create a separate widget if you need the same chat on a second site. Unlike the rest of the editor this field waits for Save rather than saving as you type, so a half-typed domain never goes live and starts turning your own visitors away.
The field is marked required, and a widget with no domain set warns you — but it does still run anywhere, which is what every widget created before this existed does. Nothing stops working until you set a domain.
You can also check this inside the workflow itself. Add an IF node after your Webhook node comparing {{ $json.headers.origin }} against your own domain and stop the workflow if it doesn't match.
Both approaches reliably stop someone copying your snippet onto a different website, because browsers set the Origin header themselves and page scripts can't fake it. Neither stops requests sent outside a browser, where that header can be set to anything. Useful, but don't treat either as a lock — they're filters.
Geofencing
Also on the Connect tab, below Domain lock, is Geofencing. Add one or more two-letter ISO country codes (for example US, GB, DE) to restrict the widget to visitors in those countries. With no codes added, the widget runs for visitors anywhere.
Verifying requests came from your widget
Every message your widget sends includes a stylchatToken field in the request body — a short-lived signed value that Stylchat issues to the page the widget is running on. Requests replayed from outside a browser won't have a valid one, so checking it filters out the most casual abuse.
The token is a SHA-256 HMAC of widgetId.origin.expiresAt, signed with a secret unique to your widget. Find it on the Connect tab under Signing secret — click to reveal, then store it in n8n as a credential rather than pasting it into the workflow itself.
To verify a message, add a Code node after your Webhook node that recomputes the HMAC and compares it to the token that arrived:
const crypto = require('crypto');

const secret = 'your-signing-secret';
const { stylchatToken, stylchatTokenExpiresAt, widgetId } = $json.body;
const origin = $json.headers.origin || '';

if (!stylchatToken) {
  throw new Error('Missing Stylchat token');
}

// expiresAt is part of what was signed, so it arrives alongside the token.
// Check it first — otherwise an old token would still verify forever.
if (Date.now() > Number(stylchatTokenExpiresAt)) {
  throw new Error('Expired Stylchat token');
}

const expected = crypto
  .createHmac('sha256', secret)
  .update(`${widgetId}.${origin}.${stylchatTokenExpiresAt}`)
  .digest('hex');

const a = Buffer.from(stylchatToken, 'hex');
const b = Buffer.from(expected, 'hex');
if (a.length !== b.length || !crypto.timingSafeEqual(a, b)) {
  throw new Error('Invalid Stylchat token');
}

return $input.all();
The expiry is checked before the signature because the signature alone proves only that Stylchat issued the token at some point — not that it's still current. A token is also tied to the exact domain it was issued for, so one lifted from your site won't verify anywhere else.
If your signing secret leaks
If the secret ends up somewhere it shouldn't — a screenshot, a shared workflow export, a support thread — open the Connect tab and click Rotate secret. A new one is generated on the spot and the old one stops working immediately.
Update your n8n credential to the new value straight after. Between rotating and updating, any workflow that verifies tokens will reject messages, so do the two together rather than leaving a gap. You don't need to re-copy or re-paste the embed snippet — the secret isn't part of it.
If a URL gets abused
n8n webhook URLs contain a long random ID. If you find yours being hit by traffic you didn't expect, regenerate the webhook URL in n8n, then re-copy the snippet from the Embed tab and replace it on your site. Every old copy stops working immediately.
Plans & billing
Free to build. One payment of $50 to unlock everything, forever.
You can build and preview widgets for free. The Pro upgrade is a single one-time payment of $50 — no subscription, no per-message billing, and every future theme, feature, and update included.
| Feature | Free | Pro ($50 once) |
|---|---|---|
| Visual editor, themes & live preview | ✓ | ✓ |
| Connect your own n8n webhook | ✓ | ✓ |
| Embed on your site (with stylchat branding) | ✓ | — |
| Remove "powered by stylchat" / white label | — | ✓ |
| Custom CSS injection | — | ✓ |
| File upload & voice | — | ✓ |
| Consent screen | — | ✓ |
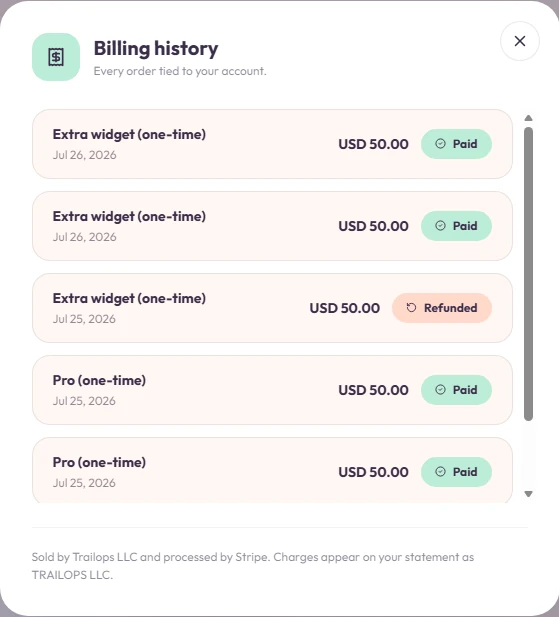
To upgrade or manage billing, open the account menu (top-right on the dashboard) and choose Billing. Payments are processed securely by Stripe.
Purchased widget billing
You can access your purchased widgets by clicking the account button in the top-right corner and then clicking Billing.
Stylchat Desk (mobile app)
A full walkthrough for setting up an AI chatbot, from a blank widget to a live human takeover on your phone.
1. Create your widget
In your Stylchat dashboard, click New widget. This gives you a widget ID and a private signing secret — you'll need both later.
Widget ID: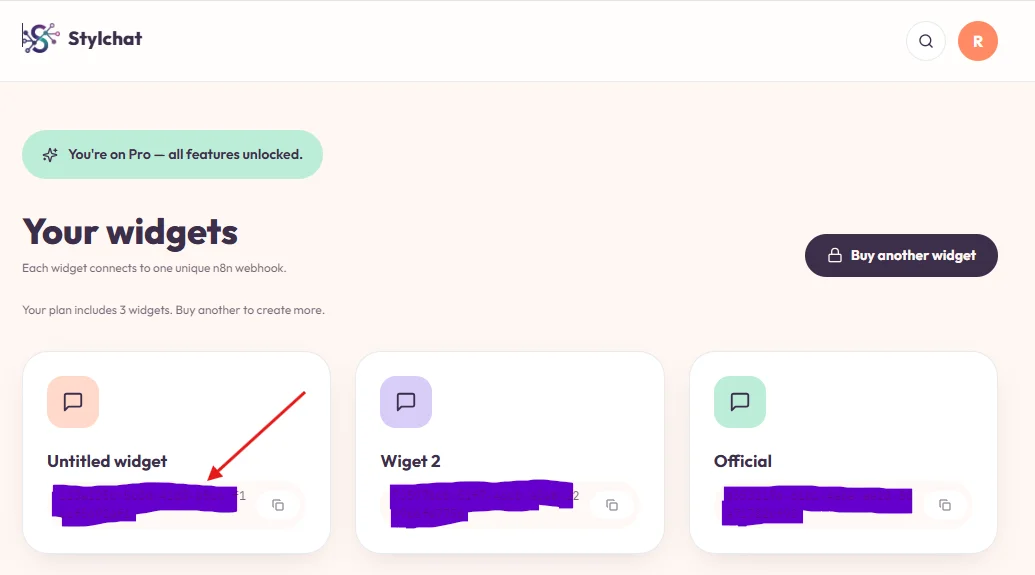
Widget secret:
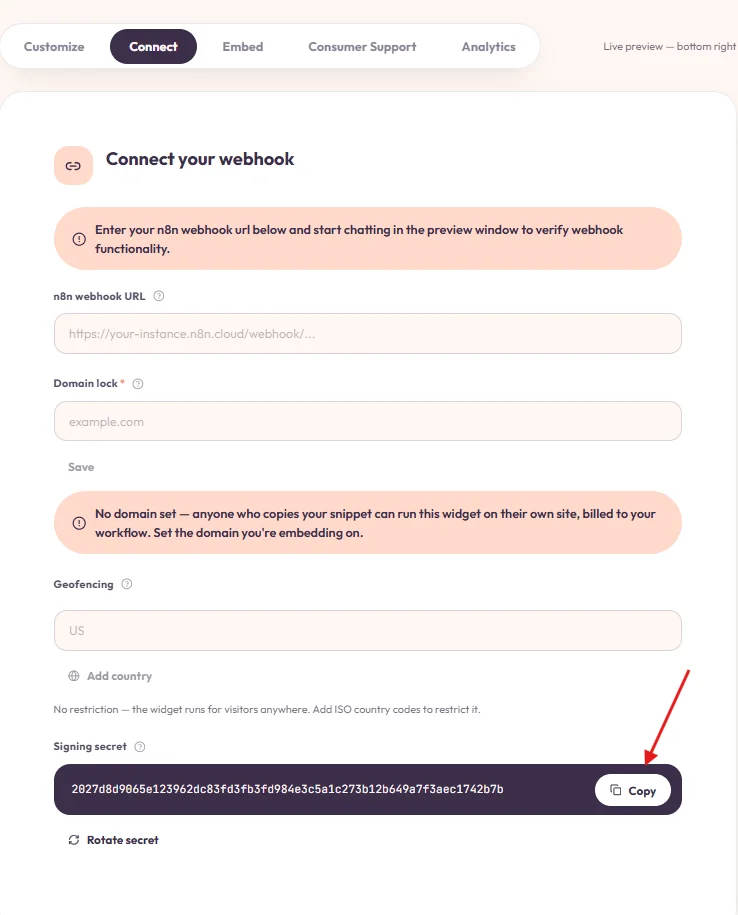
The widget ID and signing secret are per-widget. Never reuse one widget's secret in another widget's workflow — it breaks signature verification and can misattribute live sessions to the wrong widget.
2. Build the chatbot workflow in n8n
Stylchat doesn't host the AI — you connect your widget to your own n8n workflow. This is a one-time build. Here's the node chain that works:
Here is exaple of standard n8n chat workflow for stylchat
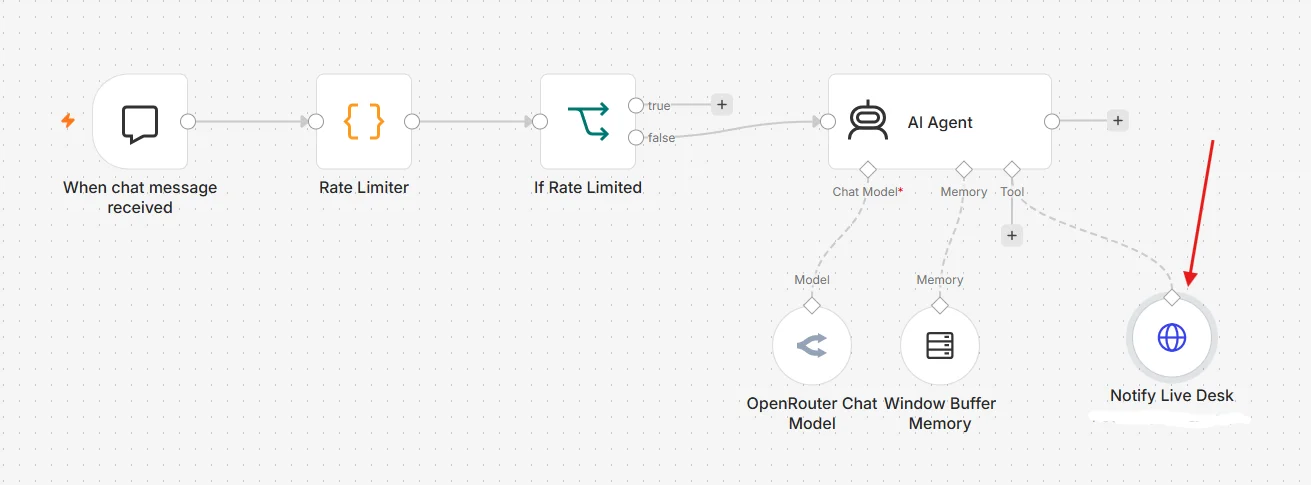
- Chat Trigger node — mode: Webhook,
public: true, response mode:lastNode. This gives you the webhook URL you'll paste into Stylchat. - (Recommended) Rate Limiter — a Code node that tracks messages per
sessionIdand blocks bursts, so one visitor can't drain your AI budget. - AI Agent node — connect a Chat Model (OpenAI, OpenRouter, Anthropic, etc.) and a Memory node (Window Buffer is fine). Write your system prompt here — this is your bot's personality and instructions.
KeeplastNode, and mind what finishes last. OnlastNodethe widget shows whatever node finishes last. That is fine for a bare bot, but once you add a node with a side effect — like the live-chat relay in step 5 — that node can finish last, and an HTTP Request returns no reply text, so your visitor sees "I'm having trouble connecting" even though the bot answered fine. A parallel branch does not avoid this: parallel branches still race to finish last. Step 5 solves it with a final Code node that re-emits the bot's reply. Do not switch the trigger to Streaming — the Stylchat widget reads a single JSON response and cannot consume a streamed one.
Model choice matters for tool-calling. If you add any tool to the AI Agent (see step 5), pick a model with reliable function-calling — gpt-4o-mini and similar first-party models work well. Small open-weight models (e.g. 8B instruct models) frequently emit malformed tool calls or skip the tool entirely.
Test the workflow in n8n's built-in chat panel before moving on — make sure the bot replies sensibly.
3. Connect the widget to your workflow
Back in Stylchat, open your widget's Connect tab:
- n8n webhook URL — paste the Production webhook URL from your Chat Trigger node.
- Domain lock — enter the exact domain you're embedding on (e.g.
example.com). Without this, anyone who copies your embed snippet can run your chatbot on their own site, billed to your workflow. - Geofencing (optional) — restrict to specific countries by 2-letter code.
- Signing secret — click Reveal to see it, or Rotate to replace it. You'll need this if you build the human-handoff step below.
Use the live preview on this page to send a test message and confirm the bot answers.
4. Embed on your site
Open the Embed tab and copy the snippet. Paste it right before the closing </body> tag on your site. Two variants are provided:
- Standard (ES module) — default, works everywhere modern.
- CSP-safe / no-module — use this if your site's Content-Security-Policy blocks inline
<script type="module">or ES module imports. It loads an external file and reads config from adata-stylchat-configattribute instead. - That's it for a working AI chatbot. Everything below is optional.
5. Live human takeover (optional)
Lets a visitor ask for a real person, notifies your team in the Stylchat Desk mobile app, and lets an agent take over the conversation — the agent's replies show up live in the widget on your site.
A. Add a tool to your AI Agent. In n8n, add an HTTP Request Tool node, connect it to your AI Agent's tool input, and name it Notify_Live_Desk. Configure:
- Method: POST
- URL: your relay endpoint
- Body (JSON): replace the widget ID and secret with your own from step 1
{{ { chatInput: $('When chat message received').item.json.chatInput, sessionId: $('When chat message received').item.json.sessionId, widgetId: 'your widget ID', secret: 'the signing secret you copied earlier' } }}The relay signs the turn and forwards it to Stylchat, so your agent's phone gets notified the moment a visitor asks for help.
B. Teach the agent when to use it. Add this to your AI Agent's system prompt (adjust wording to match your bot's voice):
HUMAN HANDOFF
If the user asks to talk to a human, a real person, a live agent, or
support -- call the Notify_Live_Desk tool immediately, before replying.
Do this for any phrasing of that request. After calling the tool, tell
the user a human has been notified and will join shortly, and keep
helping in the meantime.Pick a model that calls tools reliably — first-party models like GPT-4o mini handle this well. Small open-weight models often skip the tool or send malformed calls; if handoff feels flaky, that's the first thing to check.
C. Relay the conversation itself. The tool in step A tells your team that someone wants help. It does not send the conversation — on its own, an agent opens the session and sees an empty thread. Add two small pairs of nodes so the messages follow.
First, the visitor's side. Add a Code node named Relay Live Turn, fed from the same place your AI Agent is fed:
const crypto = require('crypto');

const WIDGET_ID = 'your widget ID';
const SECRET    = 'your signing secret';

const src = $('When chat message received').first().json;
const text = src.chatInput || src.text || '';
const sessionId = src.sessionId || 'unknown';

// Flags the session as needing a person. Deliberately not bare keyword
// matching -- that fires on questions like "what does the AI Agent node do?".
const wantsHuman = /\b(talk|speak|chat|connect|transfer|get|reach|need|want)\b[\s\S]{0,25}\b(human|agent|person|someone|representative|rep|live\s+support|support\s+staff|real\s+person)\b/i.test(text);

const payload = {
  widgetId: WIDGET_ID,
  sessionId,
  role: 'customer',
  text,
  ts: Date.now(),
  meta: wantsHuman ? { requestAgent: true } : {},
};

const body = JSON.stringify(payload);
const sig = 'sha256=' + crypto.createHmac('sha256', SECRET).update(body).digest('hex');

return [{ json: { body, sig } }];
Then an HTTP Request node named Send Live Turn after it — POST to https://api.stylchat.com/api/live/turn, header X-Stylchat-Signature set to {{ $json.sig }}, and the body sent as raw application/json containing {{ $json.body }}.
401 bad signature.Second, the bot's side. Copy those two nodes, name them Relay Bot Turn and Send Bot Turn, and hang them off the AI Agent's output instead. In the copied Code node use role: 'bot', drop the wantsHuman line and its meta, and take the text from the Agent:
const text = $json.output || $json.text || '';
if (!text || typeof text !== 'string') return [];.first(), not .item. Downstream of an AI Agent the paired-item chain is broken, and $('When chat message received').item throws "Cannot read properties of undefined (reading 'pairedItem')".Set all four nodes to On Error → Continue, and switch on Never Error for the two HTTP nodes. The relay is best-effort: if Stylchat is unreachable your visitor still gets their bot reply.
Finally, add one more Code node named Return AI Reply, and connect both Send Bot Turn and Send Live Turn into it so it is the only node either branch can finish on:
// The relay nodes return an empty body. On lastNode response mode the widget
// renders whichever node finished last, so re-emit the bot's reply here.
const out = $('AI Agent').first().json.output || '';
return [{ json: { output: out } }];Relaying every turn means an agent who takes over can read the whole conversation from the first message, instead of joining blind. Ordinary chats still stay out of the way — the Desk app's Live list only shows conversations that asked for a person or already have an agent on them, and a push notification is sent only on that first handoff request, never for routine chatter.
D. Install Stylchat Desk. Your support agents install the Stylchat Desk mobile app and sign in. When a visitor asks for a human, the conversation appears there — an agent taps Take over, and their replies appear live in the visitor's chat widget on your site.
6. Attachments during a handoff (optional)
Once an agent has taken over, both sides can exchange files and short voice clips — a screenshot of an error, a receipt, a spoken explanation. Turn each on per widget in the widget's settings (File uploads and Voice messages). Nothing else to configure: Stylchat handles the storage.
Limits (enforced on both sides).
- Files: up to 2 per conversation, 1 MB each. Restrict which types with
File upload accepted types(e.g..pdf,.png,.jpg).- Voice clips: up to 2 per conversation, 15 seconds each.
- The counts are shared between the agent and the visitor — 2 files total between the two of them, 2 voice clips total. Whoever sends the third is blocked.
Not permanent storage. Attachments live only for the conversation. They are deleted with the session — roughly 15 minutes after it goes idle — so download anything you need to keep before then. This keeps customer files off long-term storage by design.
Before a handoff (while the bot is still answering) files still go to your n8n workflow as before — this section only covers the live-agent window.